

Instance Explained: Analyzing EVM Chain Activity Using $Cocoro as an Example
TechFlow Selected TechFlow Selected
Instance Explained: Analyzing EVM Chain Activity Using $Cocoro as an Example
This article will walk you through various operations of Dev on the blockchain step by step.
Author: Zibu
The other day, Dog Mom published a new post on her blog, announcing she had adopted a new dog and collaborated with the Own The Doge community to launch an official token $cocoro on the BASE chain. The contract address is:
0x937a1cFAF0A3d9f5Dc4D0927F72ee5e3e5F82a00
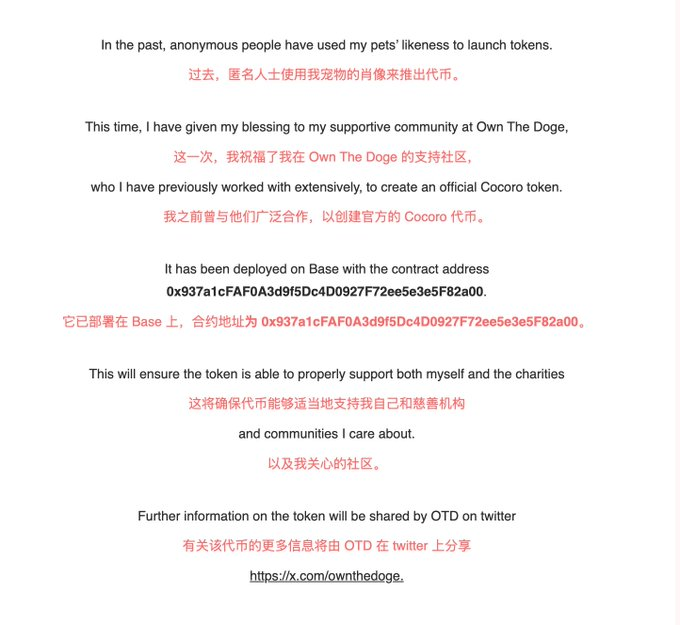
After this article was published, the token price kept rising, breaking a market cap of $100M within one hour. This article will walk you through various on-chain operations performed by the dev.
1. How to Verify Tokenomics Allocation
In the official X (formerly Twitter) account of the Own The Doge community, we can see the tokenomics for $cocoro: 75% allocated to LP, 20% to community airdrop, and 5% to DAO reserve.
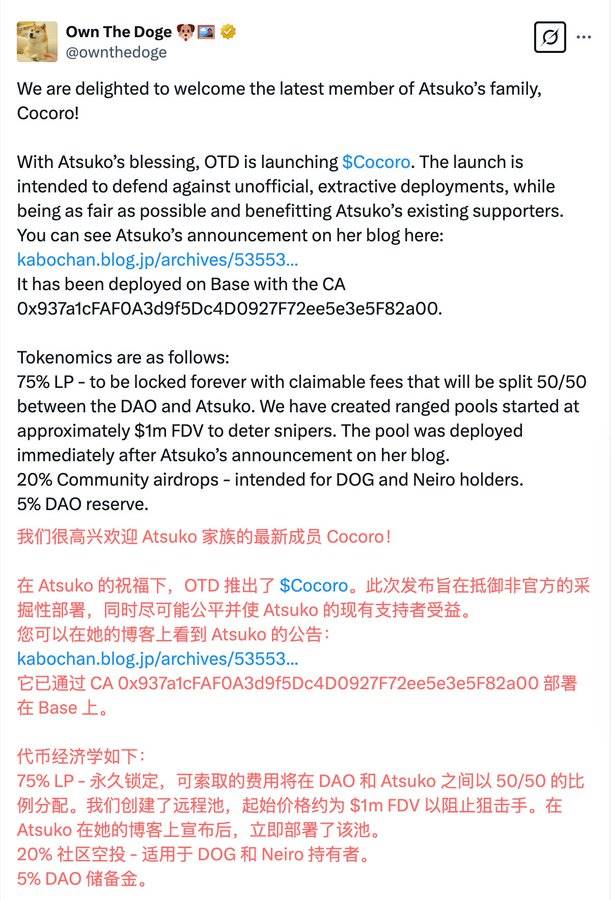
When seeing such tokenomics, how can we verify whether the dev actually followed the allocation plan?
Common tools have limited support for the BASE chain. Currently, OKX is the most user-friendly and effective tool for tracking liquidity pool changes.
Open the OKX web version and enter the $cocoro contract address (CA):
https://www.okx.com/zh-hans/web3/detail/8453/0x937a1cfaf0a3d9f5dc4d0927f72ee5e3e5f82a00
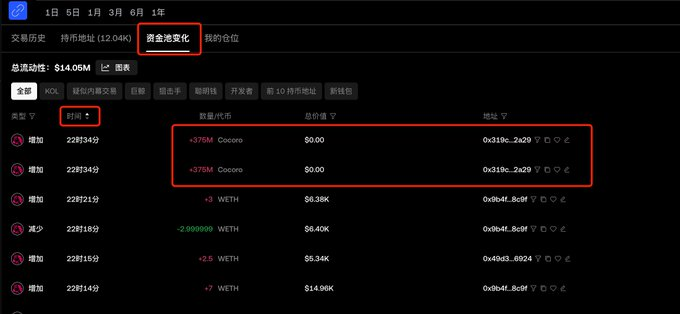
Under the 【Liquidity Pool Changes】 section, you can view all add/remove liquidity transactions. Sort by time in ascending order, and you’ll see the earliest two liquidity additions—each adding a one-sided pool of 375M $cocoro tokens. These two transactions total exactly 75%, consistent with the stated tokenomics.
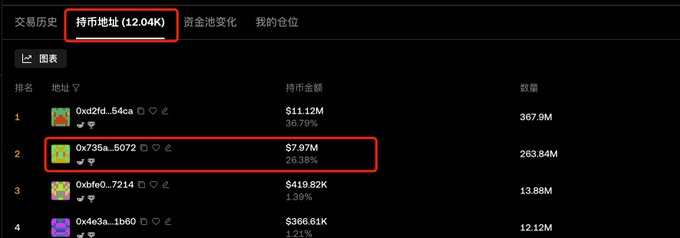
Under the 【Holders】 section, you can check wallet holdings. The second-ranked address initially held 25%, matching the combined 20% community airdrop and 5% DAO reserve. The current display shows 26.38% because the dev received trading fees from providing liquidity, increasing their balance.
2. How to Track Developer Activities
Most common tools perform poorly in identifying and analyzing dev addresses on the BASE chain. We can instead use a block explorer for deeper analysis.
1. Identify the Dev Address
Open a block explorer and input the $cocoro contract address:
https://basescan.org/address/0x937a1cfaf0a3d9f5dc4d0927f72ee5e3e5f82a00
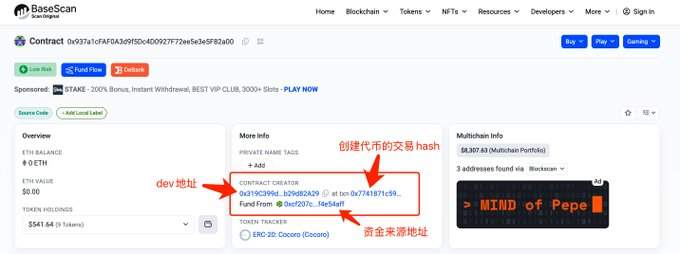
On the homepage, under 【More Info】, you’ll find contract creation details including the dev address, transaction hash for token creation, and funding source address.
From the image below, we can determine the dev address is:
0x319C399d3D7d7A2972a6A59646A060Bb29d82A29
2. View Dev Transactions
Enter the dev address into the block explorer:
0x319C399d3D7d7A2972a6A59646A060Bb29d82A29
https://basescan.org/address/0x319c399d3d7d7a2972a6a59646a060bb29d82a29
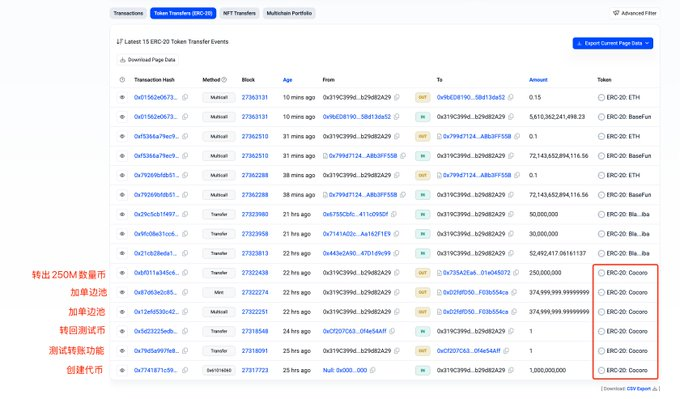
Navigate to the 【Token Transfers (ERC-20)】 tab and filter only transactions where the 【Token】 column shows “ERC-20: Cocoro”. Reading from bottom to top, each transaction is:
a. Created the token and minted 1 billion tokens
b. Sent 1 token to a test address to verify functionality (shows the dev was cautious)
c. Received back the 1 token from the test address
d. Two transactions adding 375M tokens each to one-sided liquidity pools (corresponds to Section 1’s pool additions)
f. Transferred the remaining 250M tokens to the address:
0x735A2Ea69997e668dD0f4b2a30fFa9f01e045072
3. Check LP Ownership
When adding a pool on Uniswap V3, an NFT is automatically minted that contains detailed pool information. Owning this NFT means owning the liquidity position, and transferring the NFT transfers control of the pool. Locking LP also involves actions on this NFT.
In the dev address page, go to the 【NFT Transfers】 tab to view NFT transfer history. From bottom to top:
a. The last two transactions are one-sided pool additions, which minted corresponding NFTs—matching transaction d above
b. Two separate transactions transferred both pool NFTs to the address:
0x735A2Ea69997e668dD0f4b2a30fFa9f01e045072
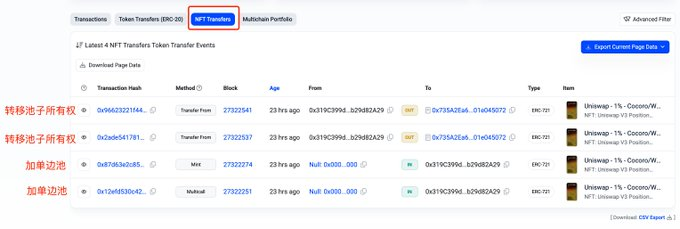
For the two transactions in a, click any one to view transaction details and obtain the NFT Token ID. For example, open the last transaction in the image above:
https://basescan.org/tx/0x12efd530c4245216596993c780075770484622cd68e9cd85e18497bf93bacd81
The details show the dev transferred 375M tokens to an address but sent no WETH, confirming it was a one-sided pool, not a two-sided one. Below, you can see the NFT Token ID for this position is 2256046, as shown.
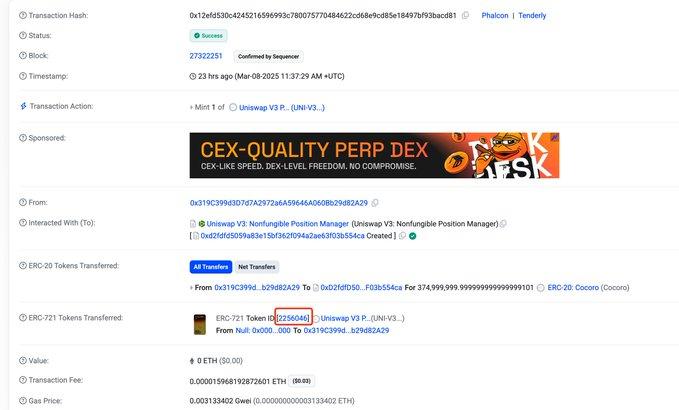
Similarly, the other pool addition corresponds to NFT Token ID 2256052.
4. Verify If Liquidity Is Locked
The Own The Doge community's official X account claimed that 75% of the LP is permanently locked. How do we verify this? From the previous section, we know the dev transferred ownership of the pools to address 0x735A2Ea69997e668dD0f4b2a30fFa9f01e045072. We now need to check if this address has taken any action to lock the liquidity.
Input this address into the block explorer:
https://basescan.org/address/0x735a2ea69997e668dd0f4b2a30ffa9f01e045072
Check the 【Transactions】 and 【Token Transfers (ERC-20)】 sections—there are no transactions related to locking liquidity, indicating that the so-called "permanent lock" mentioned on X has not yet been implemented.
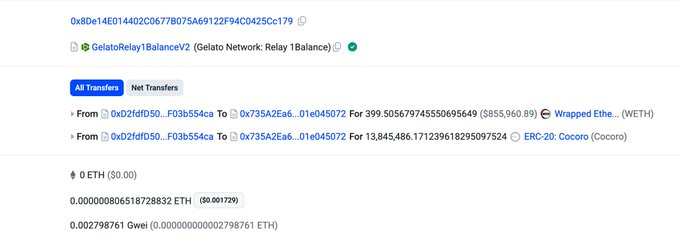
The only notable activity is a fee withdrawal transaction:
https://basescan.org/tx/0x316d0ea27ae38fd33b694e2bb444c5ec1567a56b7e4b403ec257d3c0ccb1a124
The withdrawn fees were worth approximately $1.7 million.
3. How to View Detailed LP Information
As established earlier, the dev initially created two one-sided pools. How can we examine detailed information about these pools—such as price ranges and accumulated fees?
1. Using the Official Uniswap App
Go to the Uniswap website:
Download the appropriate app based on your phone type. In wallet settings, select 【Add Wallet】 → 【View Only Wallet】 and input the address that owns the liquidity positions:
0x735A2Ea69997e668dD0f4b2a30fFa9f01e045072
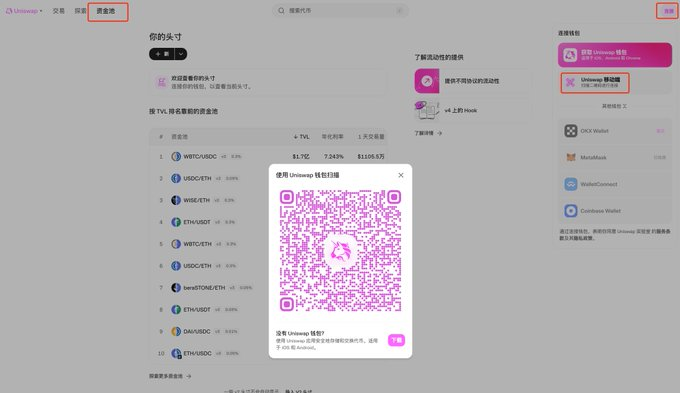
On the Uniswap website, click 【Connect】 in the top-right corner and choose 【Uniswap Mobile – Scan QR Code to Connect】. A QR code appears—scan it using the mobile Uniswap app and tap “Connect”.
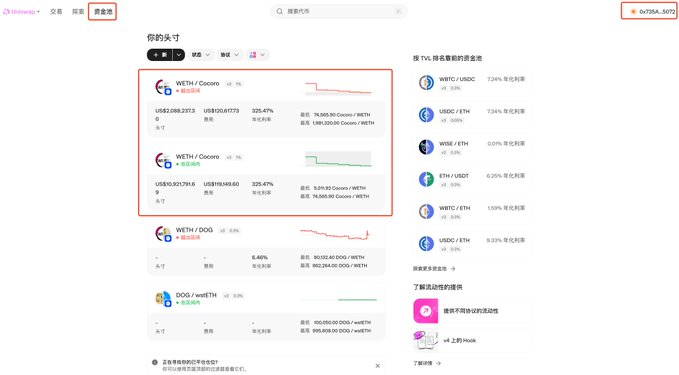
Once scanned, the web interface connects to the wallet. You'll see the connected wallet address in the top-right corner. Under the 【Pools】 tab, two liquidity positions appear—one outside its price range, the other active.
Clicking into each pool reveals full details: minimum price, maximum price, current price, remaining WETH and $cocoro balances, and unclaimed fees.
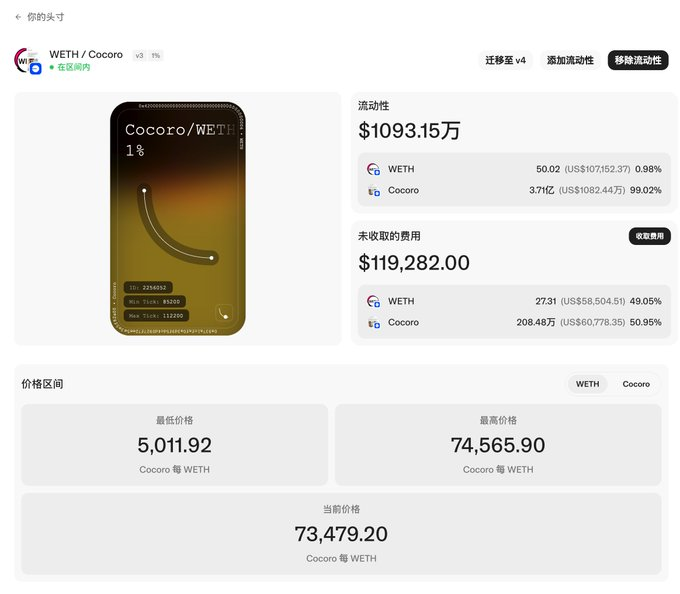
The unclaimed fees are currently $120K and $119K respectively. As previously noted, $1.7M in fees have already been collected. Thus, the team has earned a total of ~$1.94M in fees so far.
Advantage: Native Uniswap support. Disadvantage: Requires downloading the app.
2. Direct URL Access
From the method above, we learn the pool URLs follow this format:
https://app.uniswap.org/positions/v3/base/2256046
The number at the end is the NFT Token ID. From Section 2.3, we already know the two pools have Token IDs 2256046 and 2256052. Therefore, we can directly construct the URLs:
https://app.uniswap.org/positions/v3/base/2256046
https://app.uniswap.org/positions/v3/base/2256052
These links allow direct access to detailed pool information.
Advantage: Fast and convenient once you have the Token IDs. Disadvantage: Requires prior lookup of NFT IDs.
3. Simulate Using Impersonator
Impersonator is an open-source project:
Website: https://github.com/impersonator-eth/impersonator
It allows simulating login to any dApp using any Ethereum address via WalletConnect or iFrame.
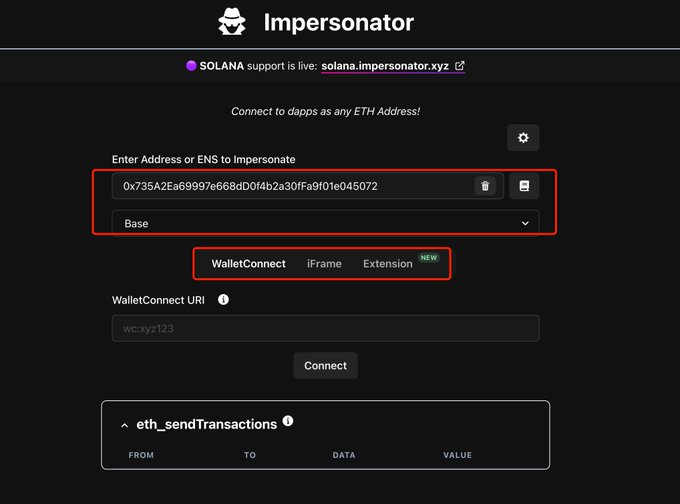
Visit the impersonator website:
You’ll need to enter a wallet address and select a chain. Enter 0x735A2Ea69997e668dD0f4b2a30fFa9f01e045072 and select “Base”. Three simulation methods are supported: “WalletConnect”, “iFrame”, and “Extension”.
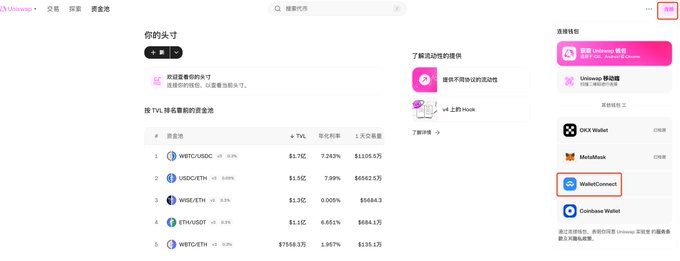
(1) WalletConnect Method
First, open the Uniswap website and click 【Connect】 → 【WalletConnect】 in the top-right corner.
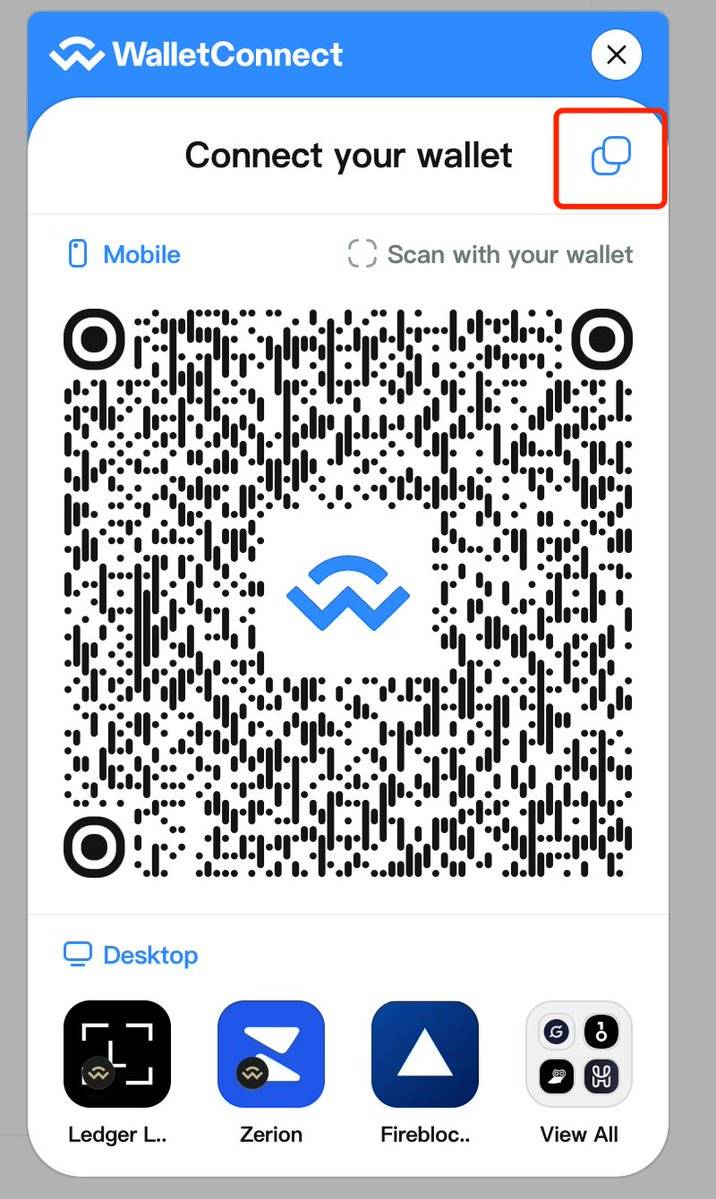
Copy the WalletConnect URI from the QR code popup and paste it into the “WalletConnect URI” field on the impersonator site. Uniswap will then connect to the specified address, allowing you to view pool details.
(2) iFrame Method
This method is simpler. Just input the Uniswap URL into the “dapp URL” field and click “Connect”. The connected Uniswap interface will appear below, enabling full access to pool information.
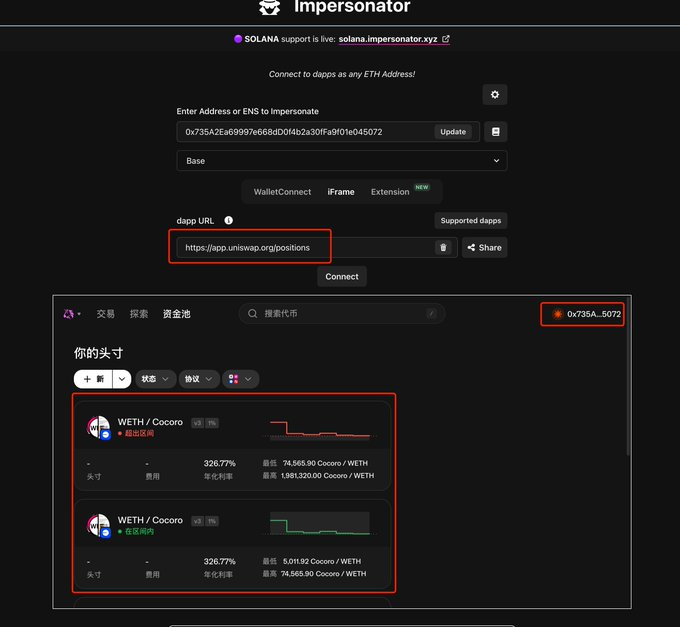
Note: Some dApps may not support iFrame. In such cases, use the WalletConnect method instead.
The “Extension” method uses a browser plugin and won’t be covered here.
Impersonator also supports Solana wallet simulation for dApps, though only via WalletConnect. As discussed in our previous article “Step-by-Step Guide: Quickly Mastering Meteora Liquidity Price Range Inspection”, the observation wallet method can be replaced with impersonation. However, Meteora currently does not support WalletConnect, limiting usability.
Join TechFlow official community to stay tuned
Telegram:https://t.me/TechFlowDaily
X (Twitter):https://x.com/TechFlowPost
X (Twitter) EN:https://x.com/BlockFlow_News