
Plain English Explanation of Web3 Phishing Fundamentals: Authorization Phishing, and the Difference Between Permit and Permit2
TechFlow Selected TechFlow Selected
Plain English Explanation of Web3 Phishing Fundamentals: Authorization Phishing, and the Difference Between Permit and Permit2
I'm not playing anymore, give me my money back.
Text by: Bocai
I only signed something—how did my money disappear?? "Signature phishing" has become hackers' favorite attack method in Web3. Recently, I've seen cybersecurity experts like Yu Xian and various wallet and security firms constantly raising awareness about signature phishing, yet people are still falling victim every day.
Bocai believes one reason is that most people don't understand the underlying logic of wallet interactions, and for non-technical users, the learning curve is too steep. That’s why Bocai decided to create a visual guide explaining the mechanics behind signature phishing in the simplest possible terms—so even non-tech-savvy people can understand it.
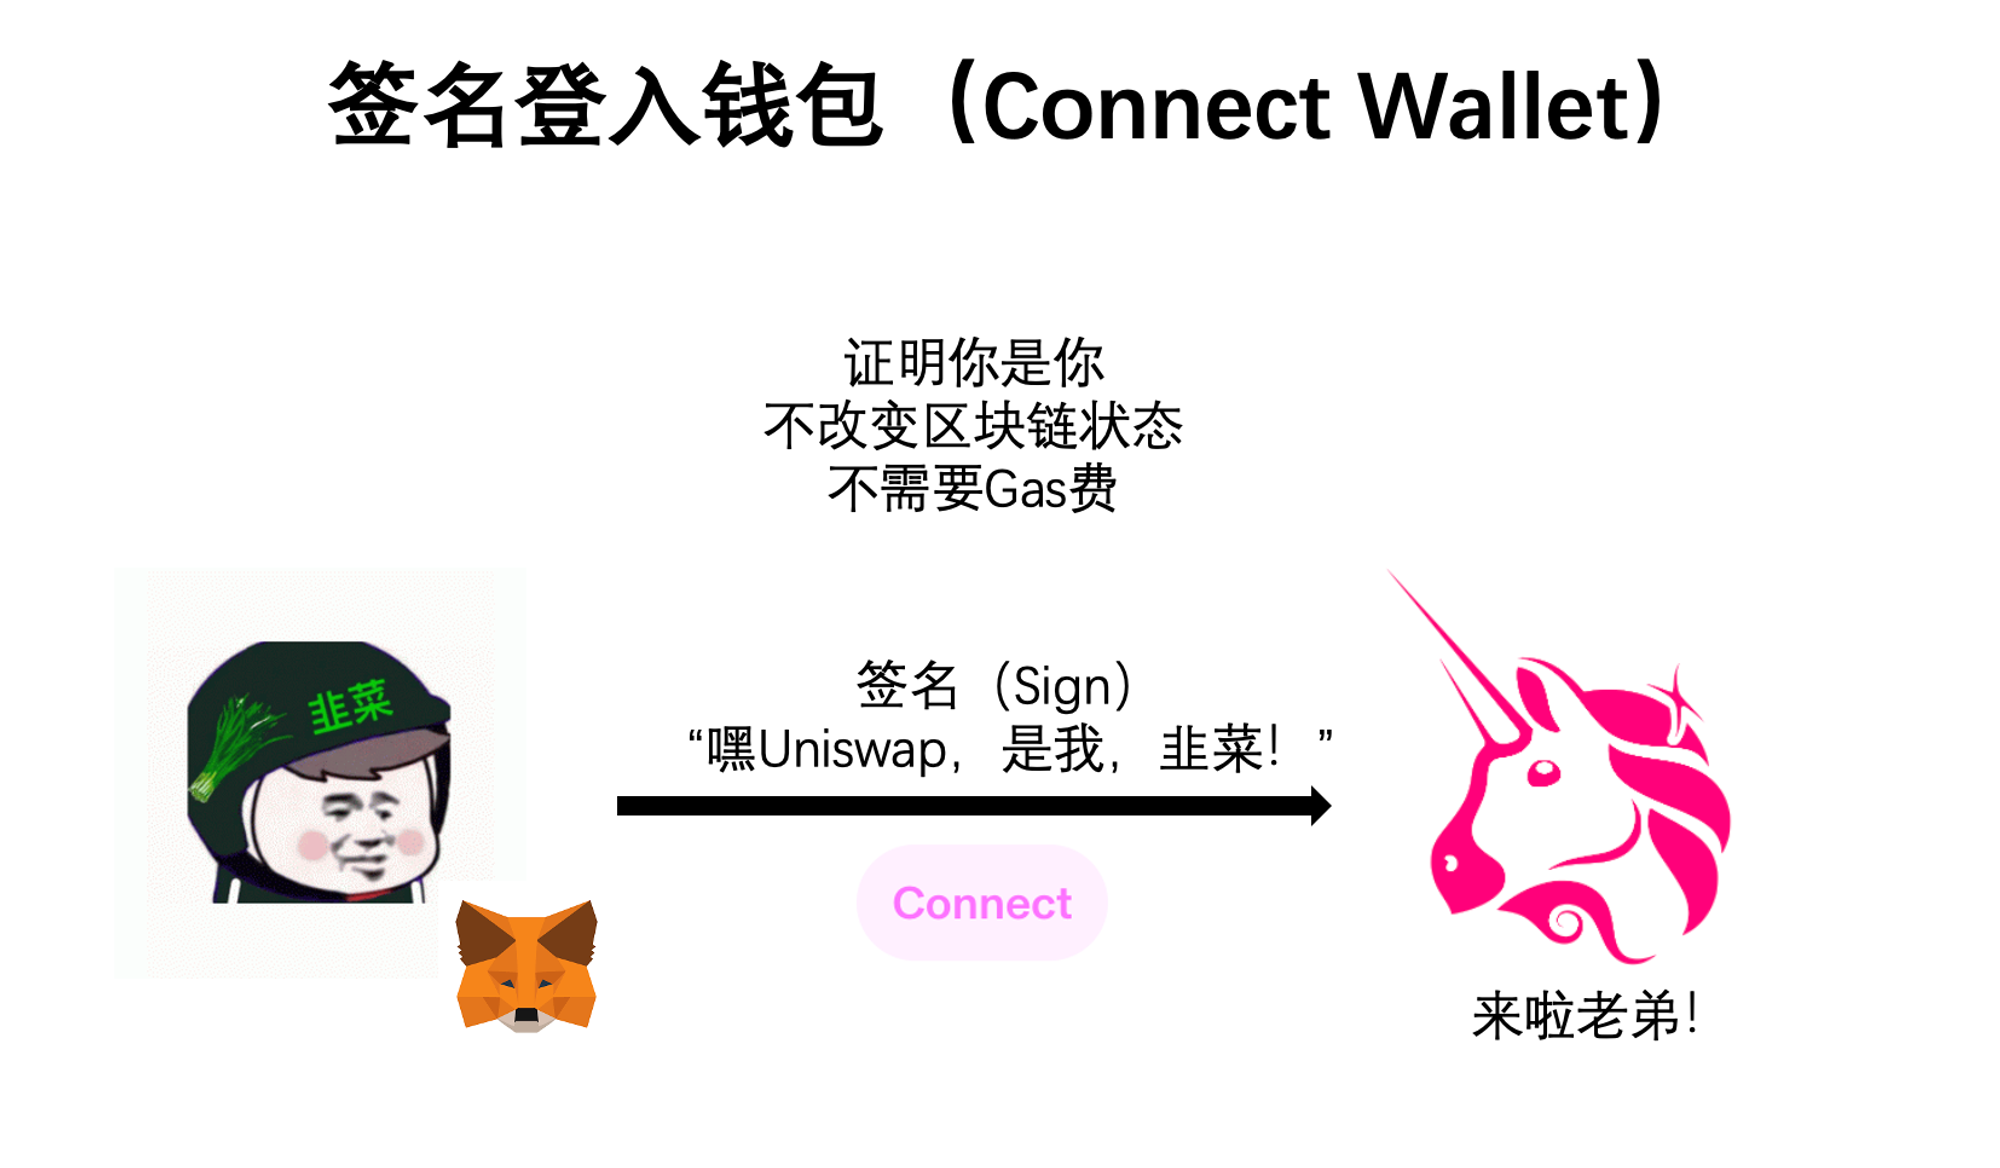
First, we need to know there are only two types of operations when using a wallet: “signing” and “interacting.” The easiest way to understand this is: signing happens off-chain (outside the blockchain) and doesn’t require paying gas fees; interacting happens on-chain (on the blockchain) and does require gas fees.
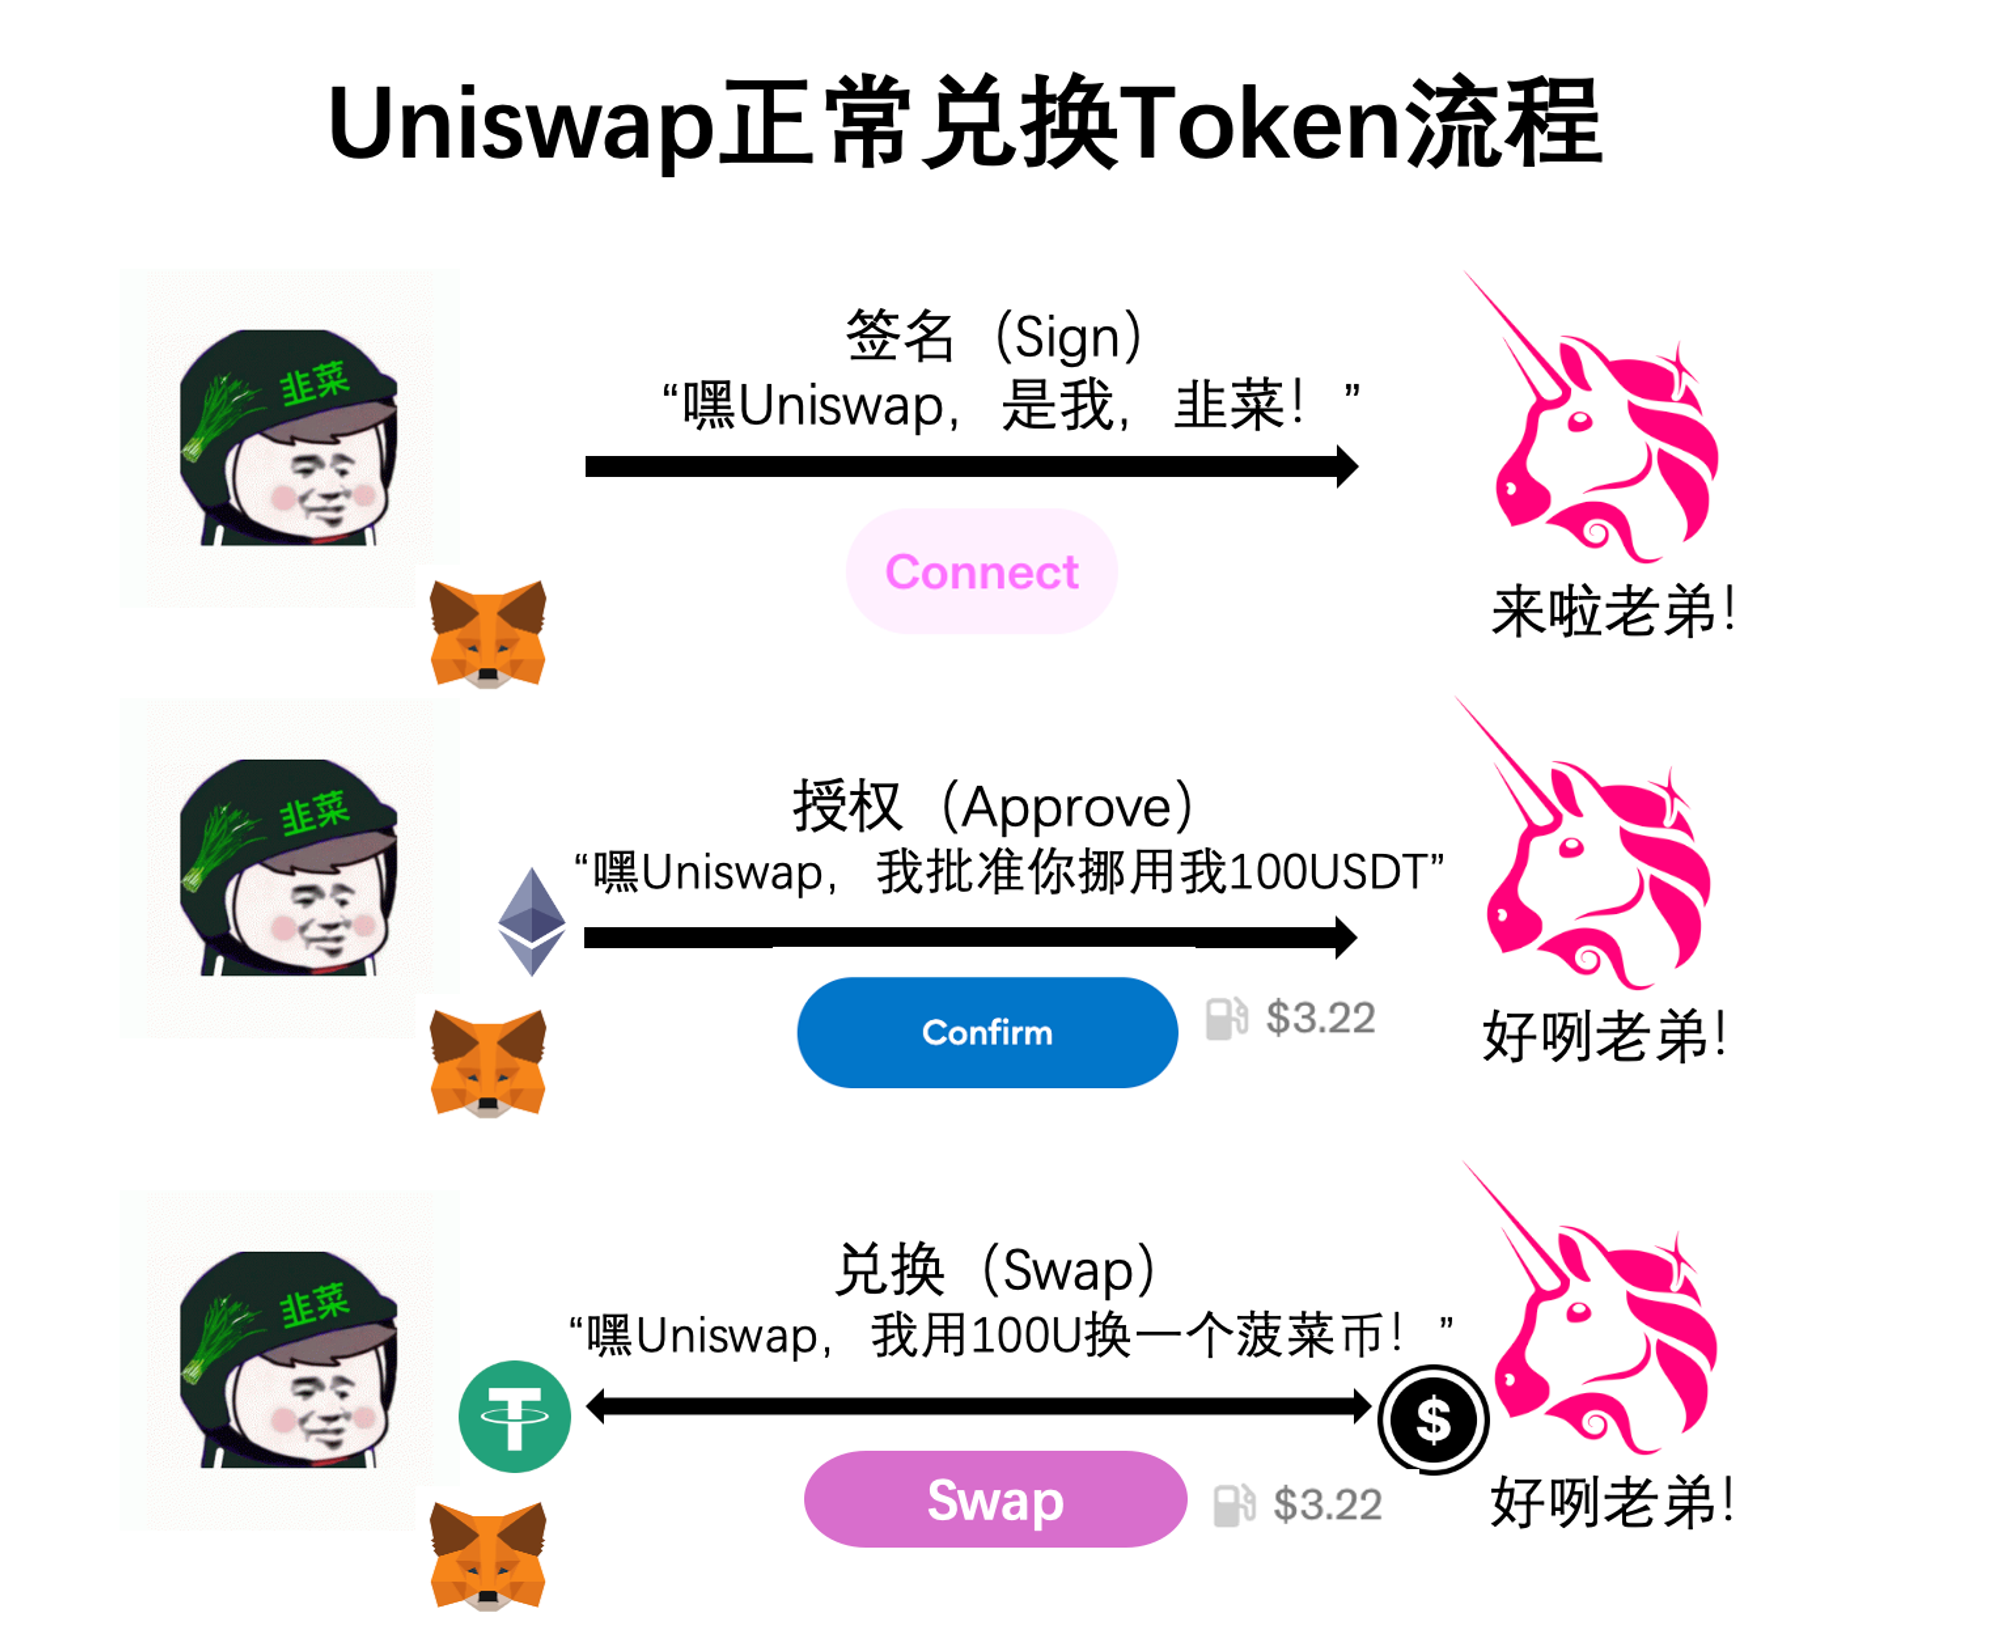
Typically, signing is used to verify your identity—for example, logging into a wallet. If you want to swap tokens on Uniswap, you first need to connect your wallet. At that point, you sign a message saying, “I am the owner of this wallet,” allowing you to use Uniswap. This step makes no changes to data or state on the blockchain, so it doesn’t cost anything.
Interacting refers to actual on-chain actions—like swapping tokens on Uniswap. To do this, you first spend some gas to send a message to the USDT smart contract saying: “I authorize Uniswap to move 100 USDT from my wallet,” which is called an approval (approve). Then, you pay another gas fee to tell Uniswap’s smart contract: “Now I’m executing the swap—I want to exchange 100 USDT for one Bocai Coin.” Only then is the transaction completed.
Now that we’ve clarified the difference between signing and interacting, let’s dive into how phishing works. Bocai will cover three common methods: approval phishing, Permit signature phishing, and Permit2 signature phishing—three of the most prevalent attack vectors today.
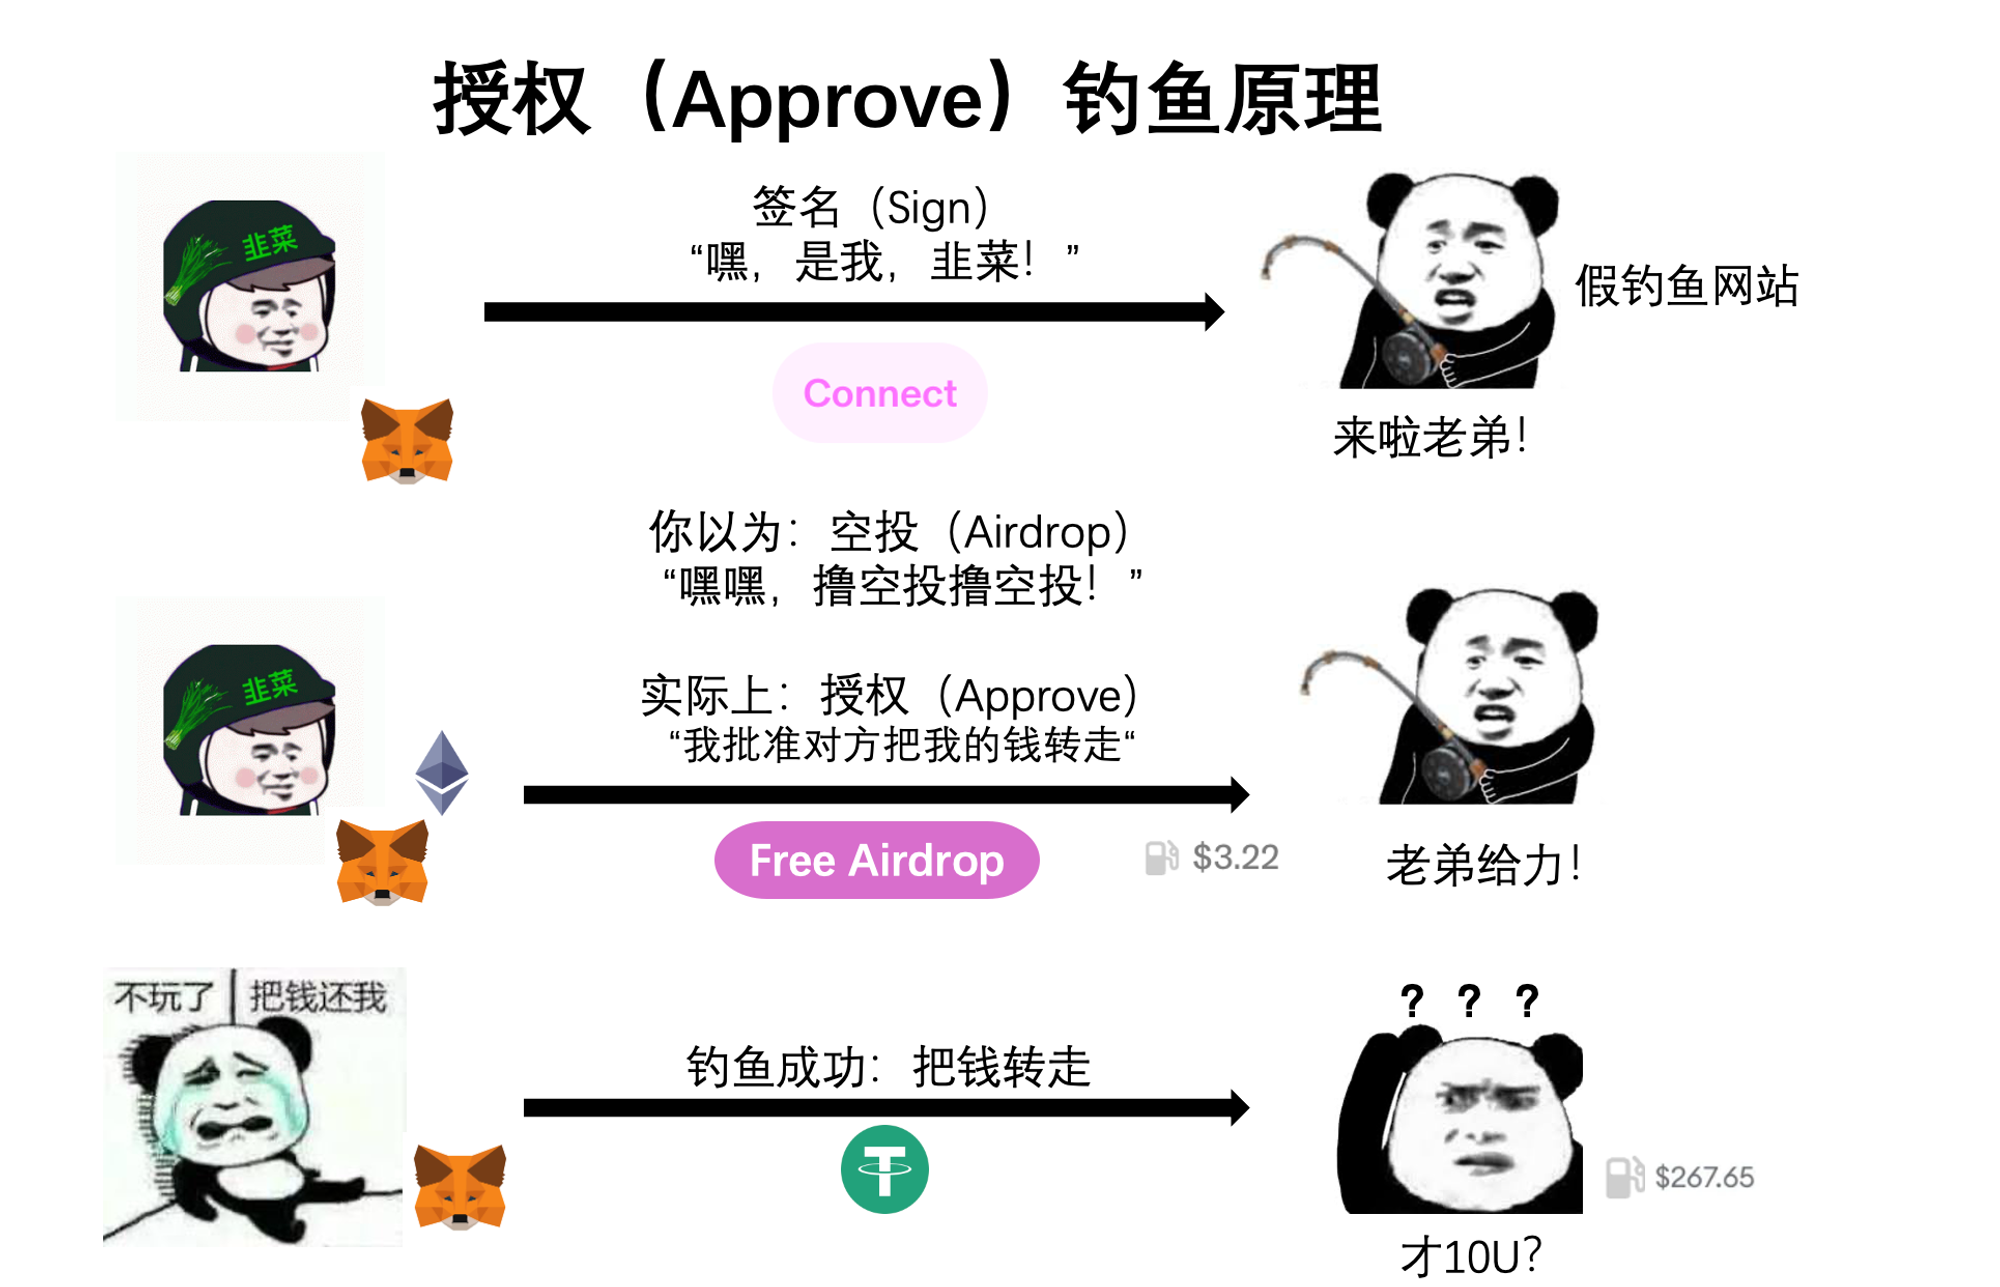
Let’s start with approval phishing—one of the classic Web3 scams. As the name suggests, it exploits the approval mechanism. From our earlier Uniswap example, we know that approving means telling a smart contract: “You’re allowed to move X amount of my tokens.” Hackers create fake phishing websites with polished frontends that mimic real NFT projects. In the center is a flashy button: “Claim Your Airdrop.” But when you click it, the pop-up in your wallet actually asks you to approve transferring your tokens to the hacker’s address. If you confirm, congratulations—the hacker just hit their KPI.
However, approval phishing has a drawback: since it requires paying gas, many users have grown cautious about spending money on unfamiliar sites. A quick glance often reveals something suspicious, making it relatively easier to avoid.
This brings us to today’s main topic: Permit and Permit2 signature phishing—the biggest danger zones in Web3 asset security. Why are they so hard to prevent? Because signing to log into a DApp has become routine. Many users assume this action is safe. Combine that with zero cost and widespread ignorance about what each signature really means—and you’ve got the perfect storm.
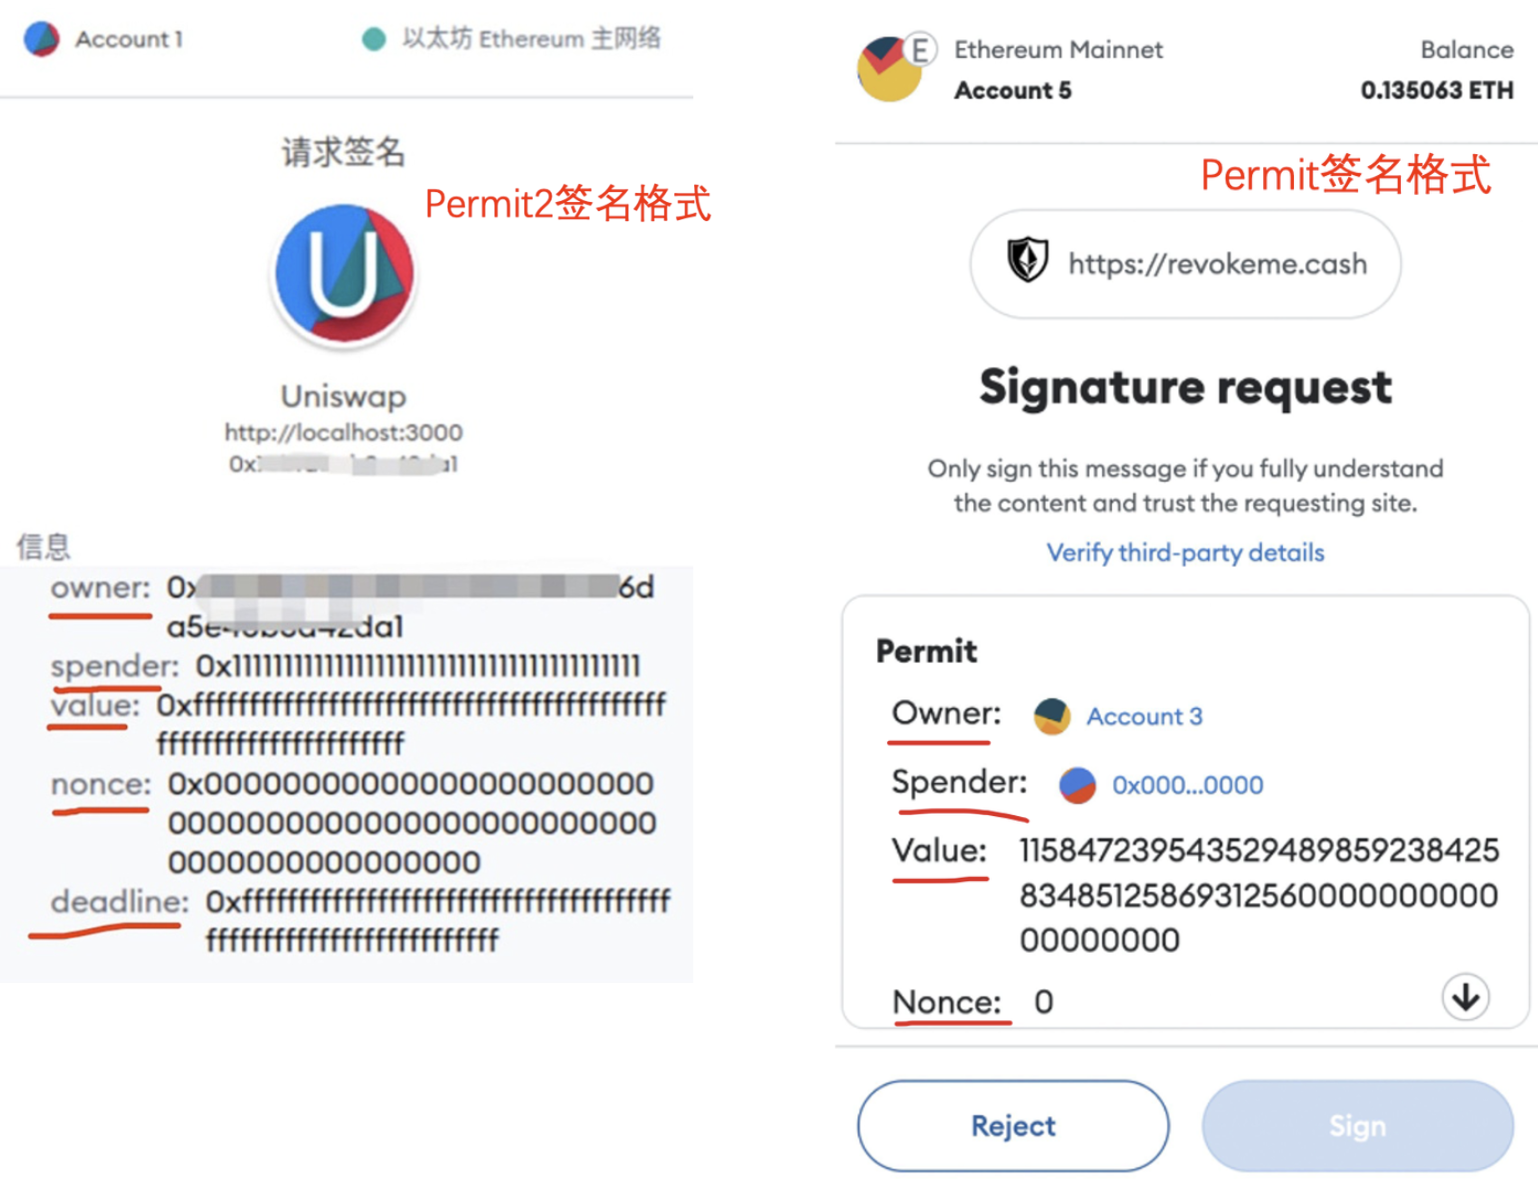
Let’s look at the Permit mechanism. Permit is an extension of the ERC-20 token standard’s approval function—USDT being a common example. Simply put, it allows you to sign permission for someone else to move your tokens. We know that regular approval (Approve) means spending gas to tell a smart contract: “You may move X amount of my tokens.” With Permit, instead, you sign a “note” addressed to someone saying: “I allow [address] to move X amount of my tokens.” That person then takes this “note” and pays gas to submit it to the smart contract, saying: “He authorized me to move his tokens.” After that, your funds are gone. Throughout this process, you only signed a message—but unknowingly allowed others to trigger an approval and drain your assets. Hackers can set up phishing sites where the “Connect Wallet” button is replaced with a malicious Permit request, easily stealing your assets.

So what is Permit2? Unlike Permit, Permit2 isn’t part of the ERC-20 standard—it’s a feature introduced by Uniswap to improve user experience. Earlier, we saw that swapping USDT for a Bocai Coin on Uniswap required two steps: first an approval (Approve), then the swap—each costing gas. To streamline this, Uniswap proposed: “Just grant us full allowance once, and every time you want to swap, just sign—we’ll handle the rest.” This lets users pay gas only once per session. And because it uses signatures, the gas isn’t paid directly by you—it’s covered by the Permit2 contract, deducted later from the tokens you receive.
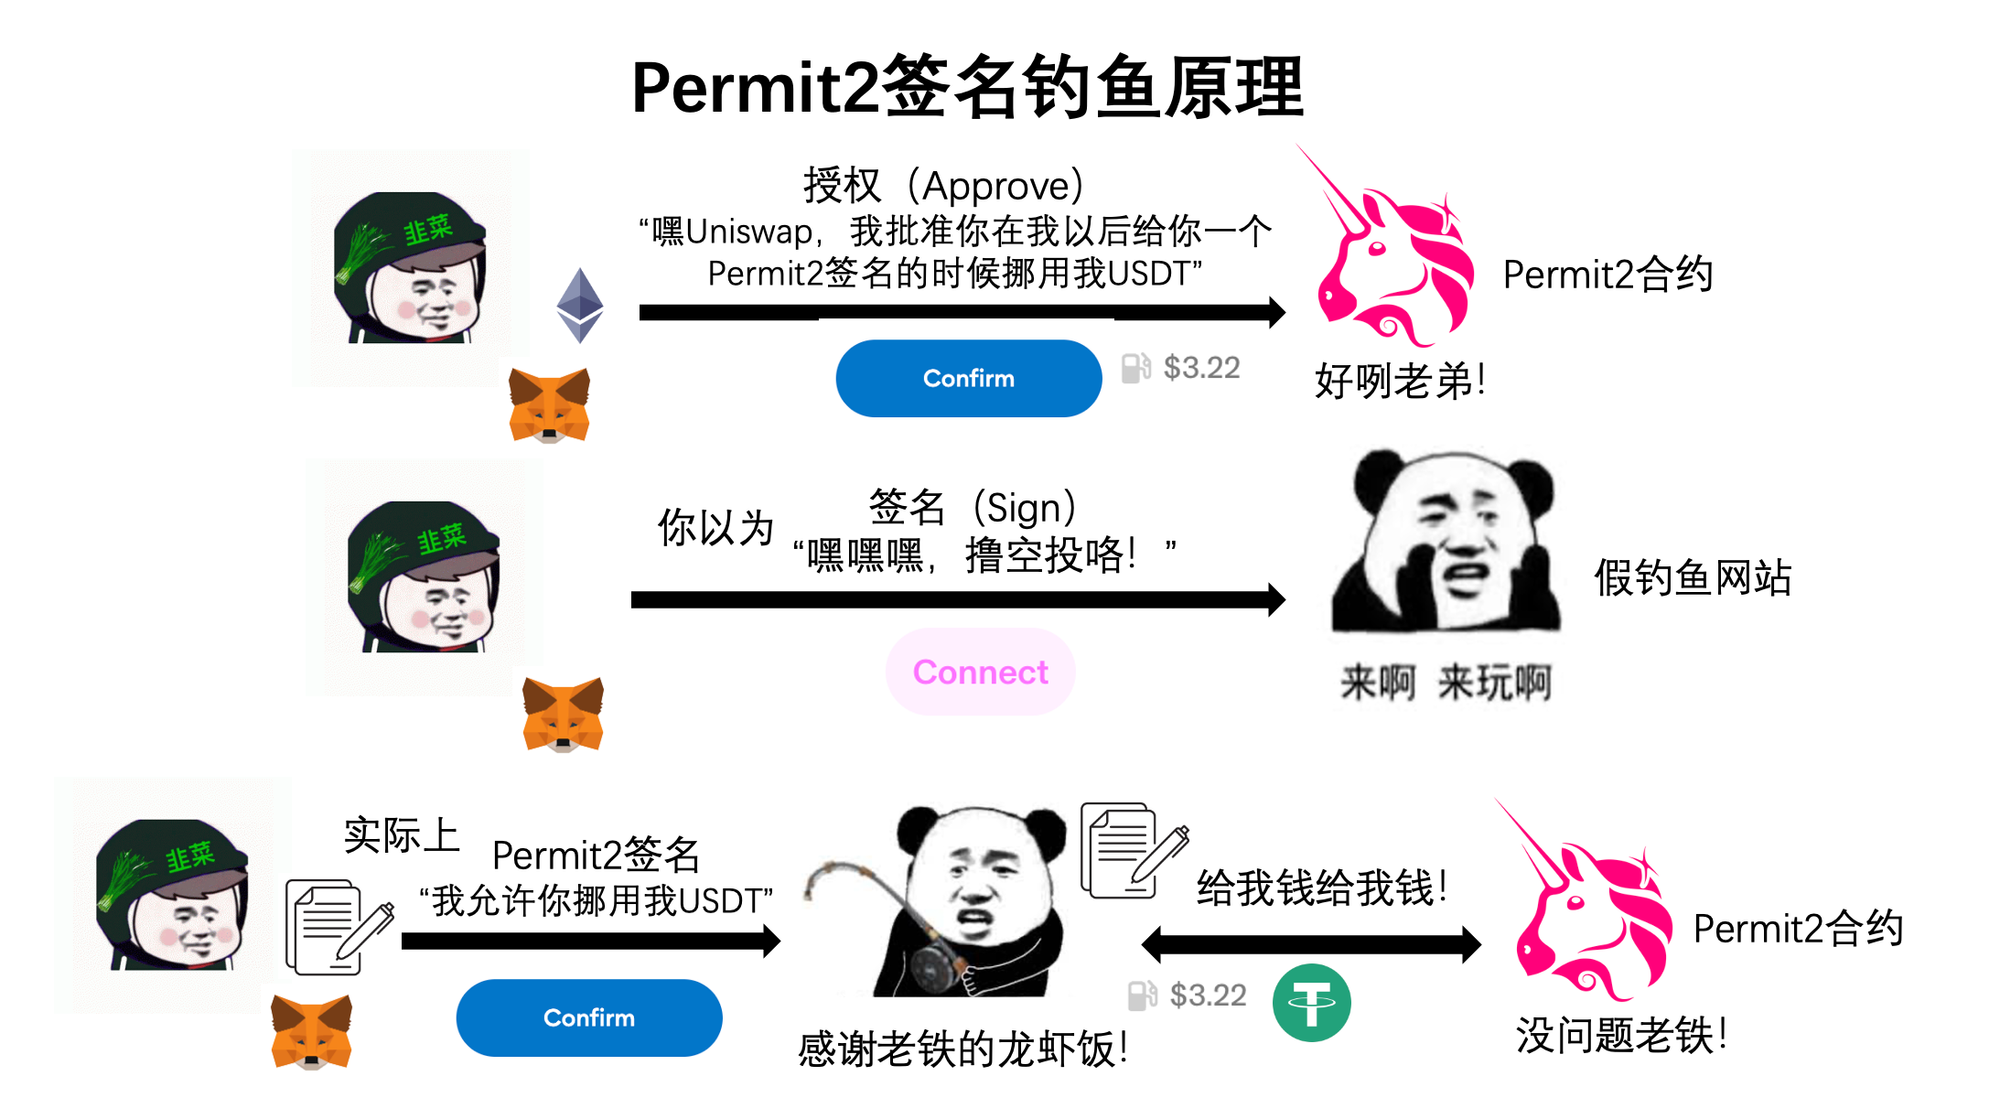
The catch? You must have previously used Uniswap and granted unlimited allowance to the Permit2 contract. Since Uniswap defaults to infinite approvals, a large number of users meet this condition. All a hacker needs is to trick you into signing a malicious message, and they can drain any tokens you’ve previously authorized.
To summarize: the essence of approval phishing is spending gas to tell a smart contract: “I authorize moving my tokens to the hacker.” The essence of signature phishing is signing a “permission slip” allowing someone else to access your assets—then they pay gas to execute the transfer. Permit and Permit2 are currently the most exploited areas for signature phishing. Permit is an authorization extension under the ERC-20 standard, while Permit2 is a new functionality launched by Uniswap.
Now that we understand the mechanics—how do we protect ourselves?
1. Most importantly, build strong security awareness. Always double-check what kind of operation you're performing whenever interacting with your wallet.
2. Separate wallets for large holdings versus active DeFi usage. This minimizes losses if compromised.
3. Learn to recognize Permit and Permit2 signature formats. Be extremely cautious if you see any of the following fields:
-
Interactive: Website URL
-
Owner: Address granting permission
-
Spender: Recipient of permission
-
Value: Amount authorized
-
Nonce: Random number
-
Deadline: Expiration time
Join TechFlow official community to stay tuned
Telegram:https://t.me/TechFlowDaily
X (Twitter):https://x.com/TechFlowPost
X (Twitter) EN:https://x.com/BlockFlow_News